Creating Backend Layouts with TYPO3 CMS to build better looking pages
By Mike Street
We've been huge fans of TemplaVoila (and Plus) - the templating extension for TYPO3. However, with v10 support still not out of beta, we took the opportunity to see what TYPO3 can do out the box with its templating system.
TYPO3 has the concept of Backend Layouts which, despite the name, can be used on the front-end of the website too. This blog post is going to walk through creating a Backend Layout and using it on the Front end of your website.
Creating Your Layout
TYPO3 offers both the CMS/database driven way and file-based approach for making your new layouts. To give accountability and to tie the layouts to related code, we opted for the file based approach. With this, however, you can use the CMS editor to build the TypoScript for you, so you can make complex file based layouts without having to write the code by hand.
Navigate to the Site Root of your TYO3 Install and create a new System Record of Backend Layout.
Using the interface, click the + and - to add and remove new rows. Click the arrows inside each cell to merge in the direction it is pointing. Once you have created your layout, click the Show PageTS-Config option and copy the result
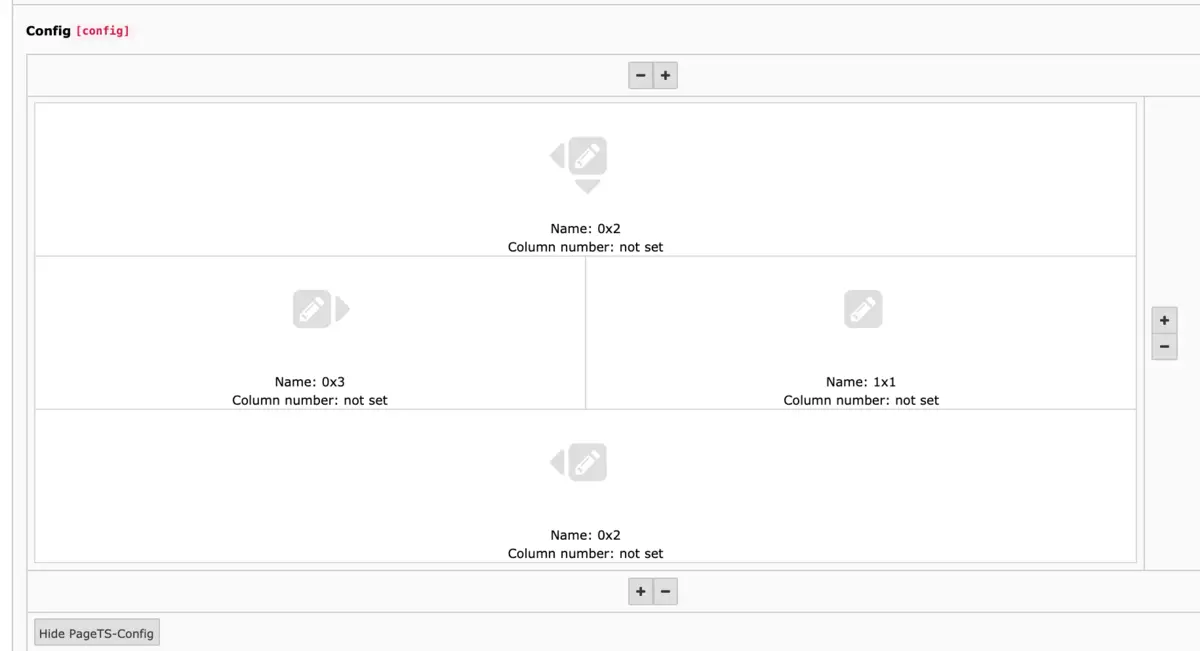
In the example above, I have created a Two Column page with a Header and Footer area which span full width. The following TypoScript was created:
mod.web_layout.BackendLayouts {
  exampleKey {
    title = Example
    icon = EXT:example_extension/Resources/Public/Images/BackendLayouts/default.gif
    config {
      backend_layout {
        colCount = 2
        rowCount = 3
        rows {
          1 {
            columns {
              1 {
                name = 0x2
                colspan = 2
              }
            }
          }
          2 {
            columns {
              1 {
                name = 0x3
              }
              2 {
                name = 1x1
              }
            }
          }
          3 {
            columns {
              1 {
                name = 0x2
                colspan = 2
              }
            }
          }
        }
      }
    }
  }
}
Once we have the initial code, we can tweak and update each cell, to make the names and widths more user-friendly.
First, we can update the exampleKey to two_column. The names (e.g. 0x2) can be changed to "Content", "Sidebar" etc. Each cell also needs a colPos, so TYPO3 knows which cell to put each bit of content.
The colPos assigns a number to that particular content section which is how TYPO3 tracks which content is where (e.g.pid 123 with colPos 2). If you have multiple templates with overlapping colPos numbers (e.g. if you always assign your main content area as colPos "5") then switching templates will keep content in those areas.
All of these elements can be updated in the Interface if desired. The last change implemented was the colspan - we wanted our sidebar to be a third of the width, so we made the main content span 2 columns.
With those changes implemented, our TSConfig now looks like:
mod.web_layout.BackendLayouts {
	two_column {
		title = Two Column
		icon = EXT:[extension_name]/Resources/Public/Icons/BackendLayouts/TwoColumn.svg
		config {
			backend_layout {
				colCount = 3
				rowCount = 3
				rows {
					1 {
						columns {
							1 {
								name = Header
								colPos = 5
								colspan = 3
							}
						}
					}
					2 {
						columns {
							1 {
								name = Content
								colPos = 0
								colspan = 2
							}
							2 {
								name = Sidebar
								colPos = 1
							}
						}
					}
					3 {
						columns {
							1 {
								name = Footer
								colPos = 10
								colspan = 3
							}
						}
					}
				}
			}
		}
	}
}
Saving Your Layout
Note: If you choose to save your layout in TYPO3, then the following steps don't need to be carried out - however we store our backend layouts in code so they can be Git tracked. If you are doing that, copy the TypoScript and exit the GUI editor in TYPO3
With the TypoScript created, we can now save it in in the following file:
Configuration/TsConfig/Page/Mod/WebLayout/BackendLayouts/TwoColumn.tsconfig
Include your .tsconfig files, by making a new file one folder up:
Configuration/TsConfig/Page/Mod/WebLayout/BackendLayouts.tsconfig
with the following contents:
@import 'EXT:[extension_name]/Configuration/TsConfig/Page/Mod/WebLayout/BackendLayouts'
Lastly, we can include our top-level BackendLayouts.tsconfig in our ext_localconf.php
<?php

defined('TYPO3_MODE') || die('Access denied.');

\TYPO3\CMS\Core\Utility\ExtensionManagementUtility::addPageTSConfig(
	'@import "EXT:[extension_name]/Configuration/TsConfig/Page/Mod/WebLayout"'
);
Any new Backend Layouts made and saved in the BackendLayouts folder will be automatically included.
Selecting Your Layout
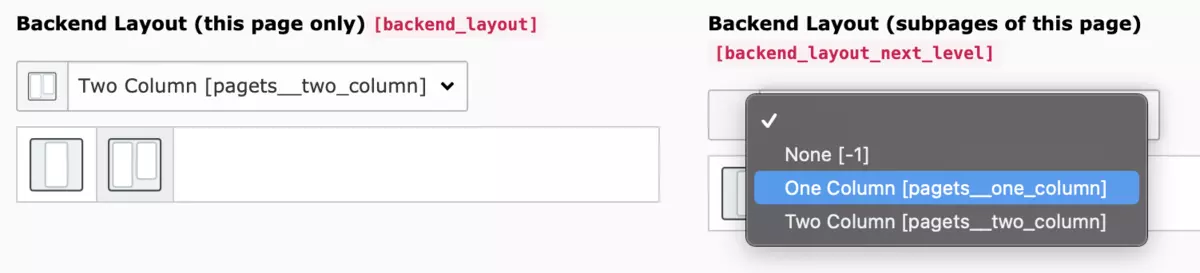
Once the cache is cleared, edit the properties of a page and head to the Appearance tab. Under Backend Layout (this page only) and Backend Layout (subpages of this page) you should find your templates available.
Note: Selecting a layout in the first, backend_layout select box does not force child pages to use that template too. They only use the backend_layout_next_level field. This may seem obvious, but coming from TemplaVoila the behaviour is slightly different.
## Using Your Layout
With the Backend Layouts made and selected, you can select the Fluid Template from the front-end automatically. The following was adapted from the Bootstrap Package and will pick up on a Pascal Case (or Upper Camel Case) converted title of your template.
Add this code below to your setup TypoScript.
page = PAGE
page {
	10 = FLUIDTEMPLATE
	10 {
		templateName = TEXT
		templateName {
			cObject = TEXT
			cObject {
				data = pagelayout
				required = 1
				case = uppercamelcase
				split {
					token = pagets__
					cObjNum = 1
					1.current = 1
				}
			}
			ifEmpty = OneColumn
		}

		templateRootPaths {
			0 = EXT:[extension_name]/Resources/Private/Templates/Page/
		}
		partialRootPaths {
			0 = EXT:[extension_name]/Resources/Private/Partials/Page/
		}
		layoutRootPaths {
			0 = EXT:[extension_name]/Resources/Private/Layouts/Page/
		}
	}
}
It uses the TYPO3 Fluid templating engine and specifies how it should work out what template the use. The templateRootPaths, partialRootPaths and layoutRootPaths which follow inform the CMS of where to find the templates and files included.
For example, if you called your template two_column, the code above will look for a TwoColumn.html in Resources/Private/Templates/Page/. If nothing is selected, a OneColumn.html will be searched for.
I hope that helps you in building, selecting and using your new Backend Layouts in TYPO3.
