Raspberry Pi: what is it and why do i need one?
By Mike Street
The Raspberry Pi is a credit card sized computer which has taken the technical world by storm. Originally developed to encourage children and schools to get into programming - the cheap device has been picked up by the development and hacking industries and has been the central device in projects no-one would have dreamed of while it was being developed.
Released in 2013, the Raspberry Pi is a UK creation made to promote the basics of programming and software development to school children. It utilises Scratch - an easy-to-understand introduction to creating sequences. The idea was to make a small, affordable computer with minimum requirements - taking IT back to basics and making it accessible to every school. More information about the history of the project can be found on the Raspberry Pi website.

From there, the Raspberry Pi has grown massively - as of 18 February 2015, over five million have been sold which makes it the fastest selling british personal computer. It’s not just schools that have taken the computer to new heights - the maker, hacker and electronic communities have found new and interesting ways to utilise the low powered micro-computer.
This blog post is a collaboration between two of our biggest Raspberry Pi fans - Mike Street and Will Chidlow who have been tinkering and building with these amazing computers for well over a year. It features an overview of some of the things that are possible with a Raspberry Pi. A few of us in the Liquid Light office are fortunate enough to own one (or two) and have had the opportunity to suss them out.
What hardware does a Raspberry Pi have?
The Raspberry Pi has got the fundamentals for a computer, but not any of the latest technologies. There is no on-board WiFi or Bluetooth (but you can buy small USB adapters).
As for connectivity, some versions feature an ethernet port while others do not to save space (for setting this up you need a screen and a keyboard). Below is a table giving you a breakdown of the current versions, their features and a summary of what they are good for.
| Name | Raspberry Pi 3 Model B | Raspberry Pi 2 Model B | Raspberry Pi A+ | Raspberry Pi Zero |
|---|---|---|---|---|
| Price (at time of writing) | £30 | £25 | £15 | £5 |
| Physical Size (W × D × H) | 85.60 mm × 56.5 mm × 15mm | 85.60mm × 56.5mm × 15mm | 65mm × 56.5mm × 10mm | 65mm x 30mm x 5mm |
| RAM | 1 GB | 1 GB | 256 MB | 512 MB |
| USB Ports | 4 | 4 | 1 | 1 |
| HDMI | Yes | Yes | Yes | Yes - Mini HDMI |
| Ethernet | Yes | Yes | No | No |
| CPU | 1.2GHz Quad-Core ARM Cortex-A53 | 900MHz quad-core ARM Cortex-A7 | 700 MHz single-core ARM1176JZF-S | 1Ghz, Single-core ARM11 |
| Power | 2.5 A | 800 mA | 200 mA | 160mA |
| Connectivity | 802.11 bgn Wireless LAN and Bluetooth 4.1 | No | No | No |
| Usage | Released on the 29th Feb 2016, this faster version of the 2 is perfect to give your slightly bigger projects a boost | With more ram and space for peripherals the B is perfect for higher demanding applications, such as a media center, games console or running a desktop GUI (Graphical User Interface) | With the small form factor and low power usage, the A+ is suited to small projects or being the brains behind an automation system. | The tiny size of the Zero means it’s perfect for wearables or robotics. Released in November 2016, the zero was hard to find within hours of release. The only downside being adapters are needed for both HDMI output and USB input. if you want to use the GPIO, you’ll also need to solder them on yourself |
Please note: The Power row above is the minimum requirements. If you are relying on your Pi to power several peripherals, consider upgrading the power source.
Always leaving it on - what can it run to help you?
With the small footprint and electricity useage of the Pi, it is a perfect solution for an “always on” device - meaning you can turn it on, set it up and leave it running somewhere without worrying too much about your electricity bill at the end of the month. One thing to be careful of is the processing power of the Pi itself - don’t expect it to be able to do any really heavy grunt work without grinding to a halt - however it is fairly happy with most personal projects. Below we’ve outlined a few things you can do with a Raspberry Pi.
Helping you develop websites
One purpose for this would be to use it as a web server. Locally (or remotely) hosting your personal files makes it an easy way to share information with family and friends (or the world) without having to pay hostage costs. As noted above, if your site attracts a lot of external traffic, the Pi may not be able to handle the load.
Another option would be to use it as a private git repository system using Gitlab. Gitlab is a similar service to Github, but allows you to self host. The Raspberry Pi is perfect for this as an always-on git server with your code hosted local to your network (so you own the data) but without compromising, or relying on, your computer to be on. This is particularly handy in an office environment where multiple users are pushing and pulling to git repositories. Gitlab have instructions on how to set it up on their blog.
Displaying dynamic media discreetly
A client of ours wanted a TV at several locations with video and web content displayed and continuously looping. The locations have Wifi but wanted the TV & units to be self contained.
With HDMI output and a tiny footprint, the Pi is the perfect solution. With a Wifi dongle and attachment to the TV, the only cable required was a power cable. The Pi is able to pull content from our web server using the locations Wifi and show locally hosted content in a slideshow. We are also able to remotely access and update the software running the media.
With it’s low profile, the Pi would also not be as attractive to any wannabe vandalisers or thieves as something like a small PC or Apple Mini would be.
Make a low-cost sound box
The Raspberry Pi has also caught the attention of music lovers and audiophiles as a low cost device for streaming audio. Whilst the standard audio out of the Pi is very low quality through the jack socket, the addition of a USB soundcard increases audio quality to an acceptable level. USB sound cards range greatly in price starting as cheaply as £1 from ebay (although we wouldn’t recommend going that cheap) up to around £30 for known brand versions. For most people’s listening requirements, using a Raspberry Pi with a USB soundcard will be perfectly adequate.
If “adequate” still isn’t good enough for your audio expectation, then a range of third party DAC’s (Digital to Analog Converter) are available that connect directly to the Pi via the GPIO connection. Most of these take the form of a HAT (Hardware Attached on Top) and are easy and quick to fit to your Pi. A DAC will produce bit perfect audio, which means the player can output an exact copy of a file without making any changes. A Raspberry Pi with a DAC attachment is far cheaper than buying a purpose built DAC and actually offers more functionality so it’s a great way to play around with DAC audio without blowing your budget.
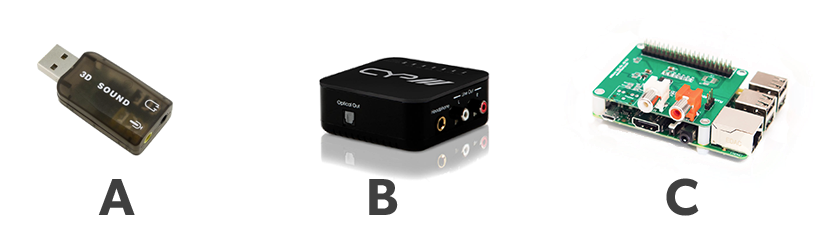
- A: A basic USB sound card [approximately £5-10]
- B: Purpose built DAC (digital to analogue converter only) [approximately £100-200]
- C: Raspberry Pi with DAC HAT attached, Digital to analogue converter complete with media player, storage and airplay! [approximately £70-90]_
In order to use a Pi in this way some setup is required but luckily for you and I, some very clever people have done all the hard work so all you need to do is choose which system you like the look of and load it onto your Pi’s micro SD card. All the options below provide the ability to stream from online sources such as radio streams, Spotify or Soundcloud, as well as playing files directly from the Pi’s SD card. In addition to that you can also play files from an attached hard drive either via wired connection or network attached storage (NAS).
To top it off, Apple device users can also use Airplay to stream music to the Pi directly from their chosen device so there really is a huge amount of choice and versatility as to how you can utilise your Pi for music playback.
Volumio
Founded and managed by Michelangelo Guarise, Volumio is an evolution of the RaspyFi Project and started in December 2012. The system is designed for High Quality Audio Reproduction, with a very easy setup process and user interface. Will tried the system and was listening to music within 5 minutes of downloading the disk image. It is completely free and Open Source, and also available for various other linux based devices other than the Raspberry Pi. Of the systems we have tried, we found Volumio’s design the easiest to use.
Pi MusicBox
Offering streaming support and player for Spotify, Google Music, SoundCloud, Webradio, Podcasts and other music from the cloud Pi MusicBox has much of the functionality of Volumio but with a slightly different user interface. The Pi MusicBox website is basic, but there is still much online support for the player.
RuneAudio
RuneAudio is made by the original team behind RaspyFi. When they stopped developing it they renamed it and started again from the ground up. Visually and functionally it is very similar to Volumio but the developer states that RuneAudio is optimised better than Volumio, this could however just be there marketing speel.
It’s not all work
We all remember playing on consoles fondly whilst growing up - so what could be more fun than a Raspberry Pi configured as a retro games console?! The RetroPie Project aims to help you set up and play games with nothing but a Pi. It’s as simple as downloading the disk image and plugging it in, adding your own ROMS, and plugging in a compatible controller (Playstation 3 bluetooth one's work particularly well) and away you go. A bit of fiddling and customising was needed to make it work well, but that’s all part of the hackery fun!
Once setup the retroPie can play games from an impressive list of old consoles right up to Sony Playstation 1 and Nintendo N64. However, Will did find N64 games to be a little slow and jumpy as they are really pushing the capabilities of the Pi’s technical specification.
Hardware
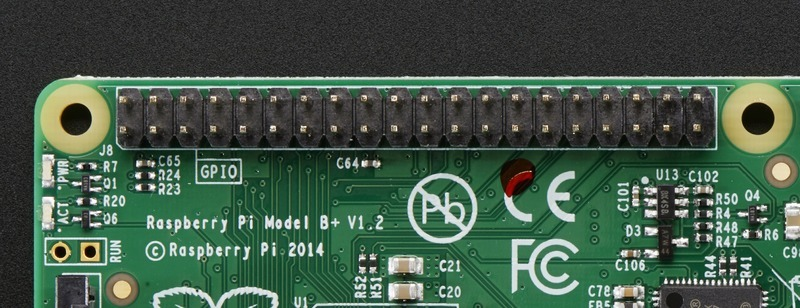
Along with the copious amounts of operating systems and software you can install on it, the Raspberry Pi has powerful General Purpose In/Out (GPIO) hardware pins. The pins are located along the top of the Pi and allow you to pass data in and out of the computer through various code snippets and libraries making it perfect as the central brains behind any electronic project ranging from home automation to robotics.
Sourcing components can be tricky - especially if you’re new to the game and not sure where to start. Below we’ve outlined the best places to get hold of hardware below:
- eBay - the (in)famous auction site holds host to the basic, entry-level cheap components you are generally after when messing about. Normally shipped from China, the hardware you can get on eBay takes a while to arrive but saves you money
- CPC - Great for small orders as generally there is no minimum on quantity - and often has free shipping over £10 (and sometimes offers free delivery on everything). Prices tend to be competitive but the site navigation & design could be better
- RS Components - A comprehensive site offering free next day delivery (and sometimes 15% / 20% discounts)
As with anything, there are a whole myriad of options, other suggestions include Hobbytronics, Pimoroni and Mouser.
Your best bet is to pick a couple you like and that stock the kind of things you need and stick with it - otherwise you spend more time choosing where to buy the components then actually buying and using them.
Setting up your Raspberry Pi for hardware use does need a little bit of setup with the software. One of our developers, Mike, has covered the basic setup process on his website.
Automate your home
Homes are getting smarter with devices such as Hue Lights and Hive on the market, helping you come home to a warmed, lit house without worrying about using too much electricity. All of this can be replicated using a Raspberry Pi and some extra components.
Using a temperature sensor, you could automate each radiator in your house - ensuring that each room is optimum temperature and making sure you’re not paying to heat a room that shouldn’t be heated. This could then be taken further by reading the temperature outside and heating the house accordingly.
You could also have Pi powered lights & appliances - there are many pre-existing control panels to help you with this and by adding a light sensor, you could have the lights come on if the room ambient light drops below a certain level (and it’s before your bedtime). A fairly new premade device to the home automation game is the nCube - simply powered by a Raspberry Pi
One thing Mike has done is attach two temperature sensors and an LCD to a Raspberry Pi - on a button press this shows the current temperature and forecast (obtained from an API) on the screen.
The code behind this can be found on Github - feel free to download and give it a go!
Music box
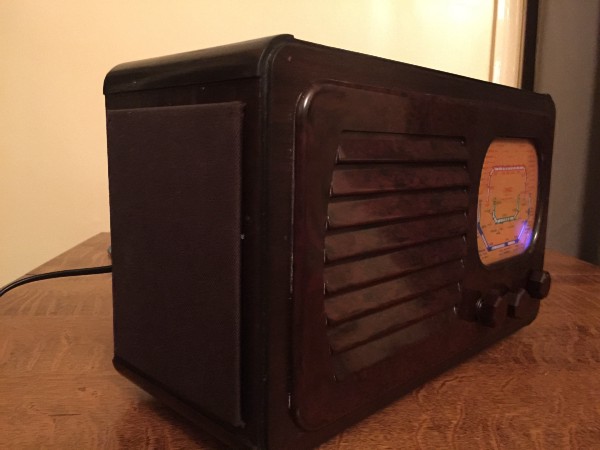
Using Volumio, one of the audio installations mentioned earlier on, Will recently made his own stereo system; restoring a 1940’s radio into a modern internet radio and music streaming box complete with airplay and bluetooth. It was a fun project that kept him out of mischief for a couple of months and taught him a great deal about the (incredibly difficult!) art of acoustics! The whole process is available as a post on Medium.
Media Centre
Kodi (previously known as XBMC) is a popular open source software media center for playing videos, music, pictures, games, and more. It’s available on various operating systems and devices and the Raspberry Pi is one such device. There are various ways to get the software up and running but we’ll just focus on 3 of the easiest methods.

From our experience OSMC seems to be the most regularly updated and its growing following means it has grown into well supported installation with a really easy install process.
Once you have got the Pi setup it becomes a really powerful addition to the living room and a great way to organise your media library. to find out more about everything Kodi has to offer checkout their website
A Desktop PC
The default operating system for the Raspberry Pi (one which is used for beginner articles and such) is Raspbian. Not only is this a linux based command line, it features a graphical interface with basic operating system functionality - including Chrome.
You can plug in a mouse and keyboard and use it as an everyday machine - not the fastest in the world but has potential as a living room computer or a minimal, quiet home computer.
The influence of the Raspberry Pi has grown as such that Microsoft have released a Raspberry Pi compatible version of Windows 10. The official website includes several tutorials to get you started (and you do need a Windows 10 laptop or desktop to get up and running). There are several other operating systems that the Raspberry Pi will run, including Ubuntu and the Firefox OS.
If you want to try the different operating systems - Raspberry Pi provide a “NOOBS” image - which allows you to chose the different GUIs to boot up.
Top 9 things to do with a Raspberry Pi
- Practice your command line skills - download Raspbian, hook up your Pi to a monitor, grab a keyboard and get practicing. If you’re new to Git it’s a perfect place to get started with our blog post.
- Make a retro gaming console - PetRockBlogs’s easy guide make it a breeze to get set up and enjoying your favorite retro console games
- Build a music box - Volumio, Rune audio and Pi Musicbox all offer software solutions to getting up and running with your very own audio player
- Automate your home - the Raspberry Pi blog has lots of home automation posts for inspiration to get you started
- Make a robot - Either make a remote controlled or autonomous robot - there are plenty of robot making tutorials across the web -once again, the Raspberry Pi blog is a great place to start
- Create a tweetbot - In the office, we’ve got a Raspberry Pi powered tweetbot. Tweet it and it records a quick video and tweets it back to you! The code can be found on Github
- Build a server - Whether it’s a NAS file system server or a mini web server, the Raspberry Pi is a perfect unit to host your files. With its small form factor, silent operation and low power consumption, it’s the ideal client to host your files
- Make a media center - OSMC helps you setup your Pi as a Kodi based media center with tons of ways to access your content
- Learn to program - always wanted to learn Ruby or Node, but never had the environment to do it? Pick up a Raspberry Pi and get started.
And an honorable mention...
Utilise the Raspberry Pi resources section - The Raspberry Pi website is stacked with tutorials and ideas to get you started. Although a lot are aimed at kids - the code provided is a great kickstart for any project
Summary
The Raspberry Pi is a supremely versatile machine and perfect for any kind of side project or hobby where cost, size or power consumption is a limitation. There is never a shortage of ideas as the ever growing community of enthusiasts continue to find new and imaginative ways to put their Pi’s to work.
We have had great fun in our office discussing and tinkering with the devices - often learning new skills along the way which sometimes have day-to-day practical applications. For us, the Raspberry Pi acts as a symbol of how far home computing has come over the last few years and it is exciting to see what the future holds for this tiny computer.
We love to hear about any other uses for a Raspberry Pi or if you’ve done something amazing with yours. To get in touch you can tweet us or use the comments below.
